定期的なサイトチェックを!
Aguse
Norton™ Safe Web
Unmask Parasites beta
[ec-cube] 会員登録を無効にする
会員登録の機能を全面的に無くしてみましょう
本来カスタムする際には、data/class_extends/pages_extends/shopping/LC_Page_Shopping_Ex.php に当該のfunction(77行目付近の「function action() {」から255行目付近の「}」までを)をコピーして使うべきなんですが、面倒なのでLC_Page_Shopping.phpに直書します。
後はヘッダにある「MYページ」や「新規会員登録」などのリンクを外して行けばOKです。(管理画面の『デザイン管理 > PC > ヘッダ/フッタ設定』から編集)
EC-CUBEのバージョンは 2.11.4 です。
ソース
対象ファイル:data/class/pages/shopping/LC_Page_Shopping.php の 223行目付近
ダウンロード
EC-CUBEのバージョンが 2.11.4 ならこちらからダウンロードして
data/class/pages/shopping/LC_Page_Shopping.php
に上書きしてください。
        default:
            // 前のページから戻ってきた場合は, お客様情報入力ページ
            if (isset($_GET['from']) && $_GET['from'] == 'nonmember') {
                $this->tpl_mainpage = $nonmember_mainpage;
                $this->tpl_title = $nonmember_title;
                $this->lfInitParam($objFormParam);
            }
            // 通常はログインページ
            else {
                $this->lfInitLoginFormParam($objFormParam);
            }

            $this->setFormParams($objFormParam, $objPurchase, $this->tpl_uniqid);
        }
↓
        default:
            $this->tpl_mainpage = $nonmember_mainpage; //←追記
            $this->tpl_title = $nonmember_title;  //←追記
            $this->lfInitParam($objFormParam);  //←追記
/*
            // 前のページから戻ってきた場合は, お客様情報入力ページ
            if (isset($_GET['from']) && $_GET['from'] == 'nonmember') {
                $this->tpl_mainpage = $nonmember_mainpage;
                $this->tpl_title = $nonmember_title;
                $this->lfInitParam($objFormParam);
            }
            // 通常はログインページ
            else {
                $this->lfInitLoginFormParam($objFormParam);
            }
*/
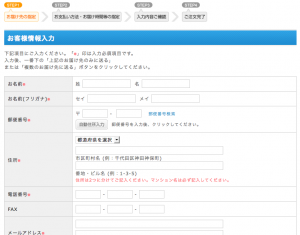
「お客様情報入力」画面で不要な部分を間引く
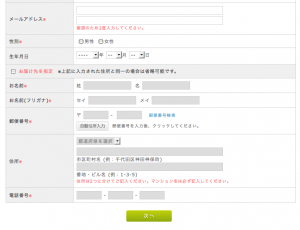
上記のお直しで無事に会員登録をスルー出来たので、ついでに「お客様情報入力」画面の下記の3点を削除&変更。
・「職業」の選択を削除する
・「複数のお届け先に送る」機能がややこしくなるので削除する
・「上記のお届け先のみに送る」をいうボタンを「次へ」ボタンに変更する
(「次へ」ボタンはデフォルトで用意されているものを使っています)
ダウンロード
こちらもEC-CUBEのバージョンが 2.11.4 ならダウンロードしてdata/Smarty/templates/default/shopping/nonmember_input.tpl
に上書きしてください。
[ec-cube] 自動転送メールにBCCを追加する
自動転送メールにBCCを追加する
ソース直書きというちょっと強引なやり方ですが、bccを2つ追記した例を。
やり方:その1
/data/class/helper/SC_Helper_Mail.php の 161行目付近
// メール送信処理
$objSendMail = new SC_SendMail_Ex();
$bcc = $arrInfo['email01'];
$from = $arrInfo['email03'];
$error = $arrInfo['email04'];
$tosubject = $this->sfMakeSubject($tmp_subject, $objMailView);
↓
// メール送信処理
$objSendMail = new SC_SendMail_Ex();
$bcc1 = "○○○○1@○○○○.co.jp"; //bccに入れたいメールアドレス1
$bcc2 = "○○○○2@○○○○.co.jp"; //bccに入れたいメールアドレス2
$bcc = $arrInfo['email01'] . "," . $bcc1 . "," . $bcc2;
$from = $arrInfo['email03'];
$error = $arrInfo['email04'];
$tosubject = $this->sfMakeSubject($tmp_subject, $objMailView);
これでOKです。
やり方:その2
もうすこしスマートにやりたい場合は、DBの [dtb_baseinfo] に email06,email07,をtextで作成しBCCに追加したいメールアドレスを入れ、ソースは以下の様に変更します。
// メール送信処理
$objSendMail = new SC_SendMail_Ex();
$bcc = $arrInfo['email01'] . "," . $arrInfo['email06'] . "," . $arrInfo['email07'];
$from = $arrInfo['email03'];
$error = $arrInfo['email04'];
$tosubject = $this->sfMakeSubject($tmp_subject);
aタグ疑似クラス、指定の順番。
いつも忘れてしますので….
この順番です、はい。
1. a:link(←未訪問)
2. a:visited(←訪問済み)
3. a:hover(←マウスオーバー)
4. a:active(←クリック)
[css] CSSだけで奇麗なナビゲーションボックスを作る
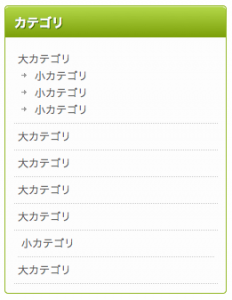
CSSだけでも割と奇麗につくれます。
ダウンロード:navi_box.zip
CSS
a {color:#666;text-decoration:none;}
a:hover {color:#666;text-decoration:underline;}

 .side_list{
	margin: 0 0 8px;
	padding: 0 0 10px;
	border: 1px solid #92B724;
	-webkit-border-radius: 4px;
	-moz-border-radius: 4px;
	border-radius: 4px;
	width: 248px;
	background: #FDFDFD;
	}

.side_list h3{
	width: 232px;
	color: #FFF;
	text-shadow: 1px 1px 0px #336600;
	display: block;
	margin: 0 0 10px 0;
	padding: 6px 6px 6px 10px;
	font-size: 14px;

	border-top: 1px solid #D3E894;

	border-top-left-radius: 4px;
	border-top-right-radius: 4px;
	border-radius-topleft: 4px;	/* Firefox */
	border-radius-topright: 4px;	/* Firefox */

	-webkit-border-top-left-radius: 4px;
	-webkit-border-top-right-radius: 4px;
	-moz-border-radius-topleft: 4px;	/* Firefox */
	-moz-border-radius-topright: 4px;	/* Firefox */

	background: #9ABE2C; /* old browsers */
	background: -moz-linear-gradient(top, #B3D748 0%, #7B9F09 100%, #ededed 100%); /* firefox */
	background: -webkit-gradient(linear, left top, left bottom, color-stop(0%,#B3D748), color-stop(100%,#7B9F09), color-stop(100%,#ededed)); /* webkit */
	filter: progid:DXImageTransform.Microsoft.gradient( startColorstr='#B3D748', endColorstr='#7B9F09',GradientType=0 ); /* ie */
	}

	* html .side_list h3{width: 204px;border:1px solid #993300;}

	.side_list li{
	border-bottom: 1px dotted #CCC;
	margin: 0 5px;
	padding: 5px;
	}

	.side_list ol,ul {list-style-type: none;}
	.side_list li ul li{
	background: url(../img/arrow.jpg) 0px 6px no-repeat;
	border: none;
	margin: 0;
	padding: 0 0 0 15px;
	}

	ul li ul{ padding: 0px 4px;}

	ul {
	margin: 0;
	padding: 0;
	}
HTML
<!DOCTYPE html PUBLIC "-//W3C//DTD XHTML 1.0 Transitional//EN" "http://www.w3.org/TR/xhtml1/DTD/xhtml1-transitional.dtd">
<html xmlns="http://www.w3.org/1999/xhtml"  dir="ltr" lang="ja">
<head>
<meta http-equiv="Content-Type" content="text/html; charset=UTF-8" />
<link rel="stylesheet" href="./css/style.css" />
<title>test</title>

<body>

<ul>
<li class="side_list">

	<h3>カテゴリ</h3>

		<ul>
		<li><a href="####" title="大カテゴリ">大カテゴリ</a>
			<ul>
			<li><a href="####" title="小カテゴリ">小カテゴリ</a></li>
			<li><a href="####" title="小カテゴリ">小カテゴリ</a></li>
			<li><a href="####" title="小カテゴリ">小カテゴリ</a></li>
			</ul>
		</li>
		<li><a href="####" title="大カテゴリ">大カテゴリ</a></li>
		<li><a href="####" title="大カテゴリ">大カテゴリ</a></li>
		<li><a href="####" title="大カテゴリ">大カテゴリ</a></li>
		<li><a href="####" title="大カテゴリ">大カテゴリ</a></li>
			<ul>
			<li><a href="####" title="小カテゴリ">小カテゴリ</a></li>
			</ul>
		</li>
		<li><a href="####" title="大カテゴリ">大カテゴリ</a></li>
		</ul>

</li>
</ul>

</body>
</html>
[css]「outline」をつかった二重の枠
「outline」をつかった二重の枠
右のキャプチャだと分かりづらいけど、結構使えると思う。
.box {
	float: left;
	display: block;
	width: 150px;
	overflow: hidden;
	margin: 0 8px 8px 0;
	padding: 7px;
	outline: 1px solid #CCC;
	border: 1px solid #FFF;
	background: #FFFEEF;
	background: -moz-linear-gradient(top, #FEFEFE 70%, #F7F7F7 100%); /* firefox */
	background: -webkit-gradient(linear, left top, left bottom, color-stop(70%,#FEFEFE), color-stop(100%,#F7F7F7)); /* webkit */
	filter: progid:DXImageTransform.Microsoft.gradient( startColorstr='#FEFEFE', endColorstr='#F7F7F7',GradientType=0 ); /* ie */
	}
[GoogleMap] 地図にオリジナルのピンを使う
サンプル
画像サイズは32×32が適頃。
ピンの画像はこれ →  (/note/wp-content/uploads/2012/01/NeedleLeftYellow.png)
ソース
		<!-- GoogleMaps v3 -->

		<script type="text/javascript" src="http://maps.google.com/maps/api/js?sensor=false"></script>
		<script type="text/javascript">
			var map;
			var infowindow;
			var gmapmark = './common/img/sumu/icon_map_pin_sumu.png';

			function initialize() {
				//例:新宿駅
				var myLatLng = new google.maps.LatLng(35.689921,139.699558);
				var myOptions = {
					zoom: 16,
					center: myLatLng,
					scrollwheel: false,
					mapTypeId: google.maps.MapTypeId.ROADMAP,
					streetViewControl: true
				};
				map = new google.maps.Map(document.getElementById("map_canvas"), myOptions);
				var image = new google.maps.MarkerImage( gmapmark , new google.maps.Size(44,41));
				var marker = new google.maps.Marker({
					position: myLatLng,
					map: map,
					icon: image
				});
			}
			function placeInfoWindow(location) {
				infowindow.setPosition(location);
				infowindow.open(map);
			}
		</script>

		<script type="text/javascript">
			window.onload = function() {
				initialize();
			}
		</script>

		<style type="text/css">
		<!--
		#content #map_canvas img {
			margin: 0;
			height: auto;
			max-width: none;
			width: auto;
		}
		-->
		</style>
		<div class="map_canvas" id="map_canvas" style="border:1px solid #979797; background-color:#e5e3df; width:100%; height:340px; z-index:1">
			<div style="padding:1em; color:gray;">Loading...</div>
		</div>
[ec-cube] お問い合わせフォームに規約同意を追加
必要な場面で使ってください
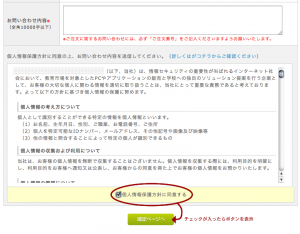
ec-cubeでのお問い合わせフォームはデフォルトでは規約の同意など無くても送信できてしまうので、そこの所を簡易的にちょこっと改変。
アップロードするファイル
・/data/Smarty/templates/default/contact/index.tpl
(お問い合わせフォームのtpl)
・/html/user_data/packages/default/html/pp.html
(iframeで表示する規約文面を追加)
・/html/user_data/packages/default/img/button/btn_confirm_disabled.jpg
(灰色のボタンを追加)
ファイル一式ダウンロード
[ec-cube] 支払方法によるメール本文の振り分け
テンプレートファイルだけの簡単な方法で処理する
最初の注文完了で自動送信されるメールの本文を支払方法によって変えます。
(このやり方だとSmartyの意味があまり無くなってしまいますが手っ取り早くという事で)
対象ファイル:/data/Smarty/templates/default/mail_templates/order_mail.tpl
<!--{if $arrOrder.payment_method == '代金引換'}-->
 (代金引換の際に掲載したい文章)
<!--{elseif $arrOrder.payment_method == '銀行振込'}-->
 (銀行振込の際に掲載したい文章)
<!--{elseif $arrOrder.payment_method == '現金書留'}-->
 (現金書留の際に掲載したい文章)
<!--{elseif $arrOrder.payment_method == '郵便振替'}-->
 (郵便振替の際に掲載したい文章)
<!--{/if}-->
aタグでsubmit
サンプルソース
忘れがちなのでメモ。
↓これだけです。
<form method="post" action="####" name="LOGIN">

<input type="text" name="" value="">
<input type="text" name="" value="">
<input type="text" name="" value="">
<input type="text" name="" value="">

<a href="javascript:void(0);" onclick="document.LOGIN.submit();return false;">ログイン</a>

</form>

